Appearance
Workflows & AI Systems
New Workflow Tabs
Workflows now include 5 tabs for comprehensive governance management: Overview, Ownership, Risk, Controls, and Evidence. This guide covers all tabs in detail.
What is a Workflow?
A workflow in SignalBreak represents a specific AI-powered process in your organisation. It's a unit of work that depends on one or more AI providers and models to accomplish a business task.
Examples include:
- Customer support ticket summarisation
- Email classification and routing
- Content generation for marketing
- Code review and suggestions
- Document extraction and analysis
By registering your workflows, SignalBreak can:
- Monitor provider health and alert you to potential disruptions
- Assess risk based on your dependencies and business criticality
- Track signals from providers that may affect your operations
- Recommend mitigation strategies for high-impact scenarios
Creating Your First Workflow
Step 1: Navigate to Workflows
From the dashboard, click "AI Workflows" in the navigation menu, then select "Add Workflow" or use the "Quick Start" wizard for guided setup.
Step 2: Define Basic Information
When creating a workflow, you'll need to provide:
| Field | Required | Description | Options |
|---|---|---|---|
| Workflow Name | Yes | A clear, descriptive name (max 255 characters) | e.g., "Customer Ticket Summarisation" |
| AI Capability | Yes | The primary AI function this workflow performs | See AI Capabilities below |
| Criticality | Yes | How critical this workflow is to your business | Critical, High, Medium, Low |
| Category | No | Business function this workflow supports | Customer Support, Sales, Marketing, Engineering, Operations, Finance, Legal, HR, Product, Other |
| Description | No | Detailed explanation of what this workflow does (max 1000 characters) | Free text |
Step 3: Set Criticality
Criticality determines how SignalBreak calculates risk scores for this workflow:
| Level | When to Use | Risk Impact |
|---|---|---|
| Critical | Complete business stoppage if this fails. Customer-facing, revenue-generating, or legally required processes. | Highest risk multiplier (×2.0) |
| High | Significant business impact. Major delays or degraded service if this fails. | High risk multiplier (×1.5) |
| Medium | Moderate impact. Workarounds available but inconvenient. | Medium risk multiplier (×1.0) |
| Low | Minor impact. Nice-to-have features or experimental workflows. | Low risk multiplier (×0.5) |
Tip: Start by mapping your 3-5 most critical workflows—the ones that would hurt most if they failed.
Step 4: Configure AI Capability
The AI Capability field describes what type of AI task this workflow performs:
| Capability | Description | Typical Use Cases |
|---|---|---|
| Summarise | Condensing long-form content into key points | Email summaries, document abstracts, meeting notes |
| Classify | Categorising or labelling content | Ticket routing, sentiment analysis, content moderation |
| Extract | Pulling specific data from unstructured text | Invoice parsing, entity extraction, form filling |
| Generate | Creating new content from prompts or templates | Marketing copy, code generation, email drafting |
| Retrieval (RAG) | Retrieval-augmented generation; finding and using relevant context | Q&A systems, knowledge base search, chatbots |
| Agent | Autonomous AI that plans and executes multi-step tasks | Complex automation, research assistants, workflow orchestration |
| Code | Code generation, review, or analysis | Code suggestions, pull request reviews, bug detection |
| Translate | Language translation or localisation | Multi-language support, content localisation |
| Moderate | Content moderation and safety checks | User-generated content review, policy enforcement |
Managing Provider Bindings
Once you've created a workflow, you must configure at least one provider binding before SignalBreak can monitor it.
What is a Provider Binding?
A provider binding connects your workflow to a specific AI provider and model. It defines:
- Which provider supplies the AI capability
- Which model you're using
- The role of this provider (primary or fallback)
- Fallback behaviour if the provider fails
Adding Your First Provider Binding
- Navigate to the workflow detail page by clicking on your workflow in the list
- Click "Add Provider Binding" (or "Add Fallback" if you already have a primary provider)
- Select a provider from your enabled providers
- Choose a model from the dropdown (only models you've enabled will appear)
- Set the binding role:
- Primary: The default provider used for this workflow
- Fallback: A backup provider used if the primary fails
- Configure fallback type (see below)
- Save the binding
Important: Every workflow must have at least one primary provider binding. You can have multiple fallback bindings.
Binding Roles
| Role | Purpose | Quantity |
|---|---|---|
| Primary | The main provider you use for this workflow in normal operation | Required (at least 1) |
| Fallback | Backup provider(s) used when primary is unavailable or degraded | Optional (0 or more) |
You can toggle between primary and fallback roles using the role selector on each binding.
Fallback Types
Fallback type controls how SignalBreak recommends handling provider failures:
| Fallback Type | Description | When to Use |
|---|---|---|
| No Fallback | No automatic failover configured | You handle failures manually or have no backup plan |
| Same Provider, Different Model | Switch to a different model from the same provider | Provider offers alternative models with similar capabilities |
| Alternative Provider | Switch to a completely different AI provider | You have contracts with multiple providers for redundancy |
Best Practice: Critical workflows should have at least one fallback binding to minimise downtime risk.
Technical Details (Optional Fields)
Usage Pattern
Describes when this workflow runs:
| Pattern | Description |
|---|---|
| Continuous | Always-on, 24/7 operation |
| Business Hours | Runs during office hours only |
| Batch | Scheduled batch processing |
| On Demand | Triggered manually or ad-hoc |
Volume Band
Expected call volume to the AI provider:
| Band | Estimated Daily Calls |
|---|---|
| Low | < 1,000 calls/day |
| Medium | 1,000 - 10,000 calls/day |
| High | > 10,000 calls/day |
Latency Sensitivity
How time-sensitive this workflow is:
| Sensitivity | Response Time Requirement |
|---|---|
| Low | Seconds to minutes acceptable |
| Medium | Sub-second to seconds |
| High | Real-time (< 500ms) |
Human in Loop
Toggle indicating whether a human reviews or approves AI outputs before they're actioned.
- Yes (default): AI outputs are reviewed by a human
- No: AI outputs are used directly without human oversight
Ownership
Assign an owner to each workflow to establish accountability:
- Owner Name: The person responsible for this workflow
- Owner Role: Their job title or function
- Owner Email: Contact for notifications about this workflow
Owners receive alerts when:
- High-impact signals affect their workflow's providers
- Risk scores exceed thresholds
- Scenarios require attention
Best Practices
Start Small
Don't try to map every workflow on day one. Focus on your 3-5 most critical workflows first—the ones where failure would have the biggest business impact.
Be Specific
Use clear, descriptive names like "Customer Ticket Summarisation" instead of vague names like "AI Workflow 1".
Assign Owners
Ensure every workflow has a named owner who understands the business context and can respond to alerts.
Configure Fallbacks for Critical Workflows
If a workflow is marked Critical or High, strongly consider adding at least one fallback provider binding.
Review Regularly
As your AI usage evolves, revisit your workflows quarterly to:
- Update criticality levels
- Add new provider bindings
- Retire deprecated workflows
- Adjust volume bands and usage patterns
Common Issues
"Provider Configuration Required" Warning
Cause: You've created a workflow but haven't added any provider bindings.
Solution: Click "Add Provider Binding" and select a provider from your enabled providers. If you don't have any providers enabled, visit the Providers page first.
"No models enabled for this provider"
Cause: The selected provider doesn't have any models enabled in your account.
Solution: Go to the Models page, select the provider, and enable at least one model that matches your workflow's capability.
"Cannot remove the last primary provider"
Cause: You're trying to delete or change the role of the only primary provider binding.
Solution: Either:
- Add a new primary provider binding first, then delete the old one
- Change a fallback binding to primary before removing the current primary
Workflow Not Appearing in Risk Assessments
Cause: The workflow either:
- Has no provider bindings configured
- Has no models assigned to its bindings
- Is filtered out by your current view
Solution: Check that your workflow has at least one complete binding (provider + model selected).
Next Steps
- Configure Provider Health Monitoring to understand how SignalBreak tracks provider status
- Understand Risk Scoring to learn how your workflow configuration affects risk calculations
- Set Up Scenarios to plan responses to potential disruptions
Workflow Detail Tabs
Once you've created a workflow, the workflow detail page provides 5 tabs for comprehensive management:
Tab Navigation
Access tabs via: /dashboard/workflows/{workflowId}?tab={tabName}
| Tab | Purpose | When to Use |
|---|---|---|
| Overview | Basic workflow config, provider bindings | Initial setup, add/edit bindings |
| Ownership | RACI assignments, control ownership | Assign accountability, set team roles |
| Risk | Risk identification and severity | View risks, check treatment status |
| Controls | Risk treatment decisions, mitigation patterns | Document controls, justify risk acceptance |
| Evidence | Stability assessment, compliance evidence | Verify controls work, prepare for audits |
Overview Tab
The Overview tab contains the core workflow configuration you set during creation, plus provider bindings management.
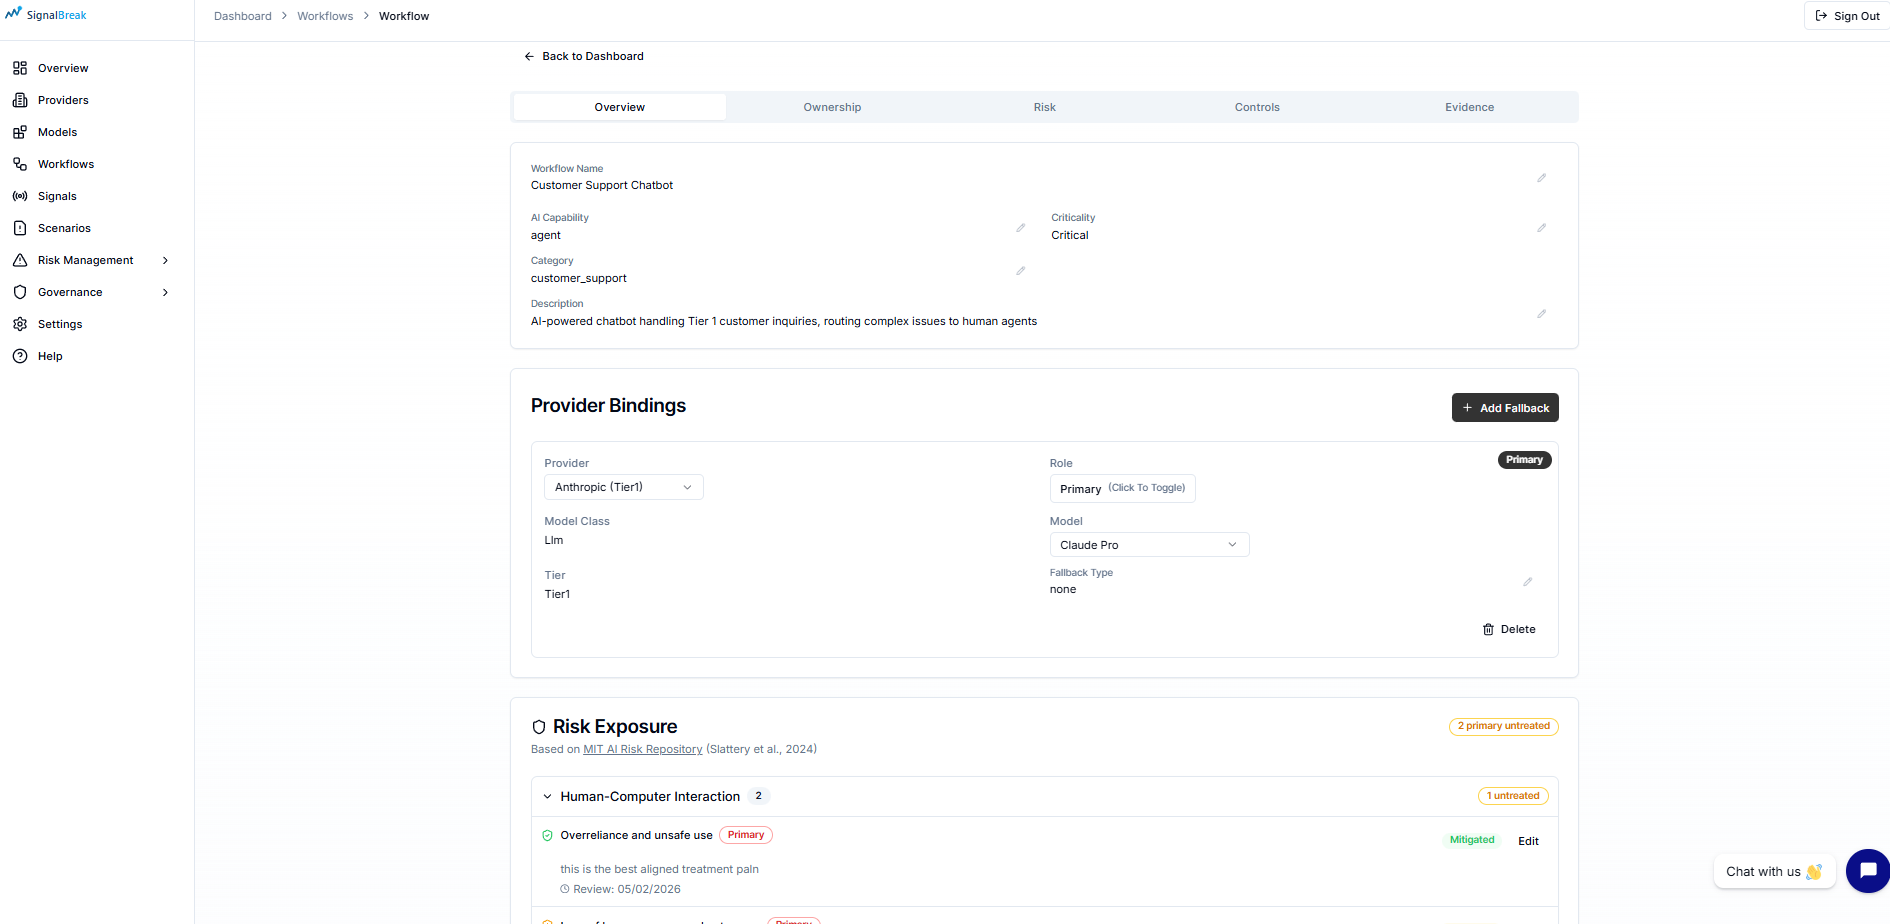
What You'll See:
- Workflow name, AI capability, criticality
- Business context and description
- Owner information (name, role, email)
- Provider bindings list with primary/fallback indicators
- Quick actions: Add Binding, Edit Workflow, Delete Workflow
For details on provider bindings, see the Managing Provider Bindings section above.
Ownership Tab
Purpose: Establish clear accountability using the RACI model (Responsible, Accountable, Consulted, Informed) and assign control ownership.
RACI Role Assignments
The Ownership tab displays 5 RACI roles for governance accountability:
| Role | RACI | Responsibility | Example |
|---|---|---|---|
| Workflow Owner | Responsible (R) | Does the work, implements controls | Product Manager |
| Executive Sponsor | Accountable (A) | Final decision authority, approves budget | VP of Engineering |
| Platform Lead | Consulted (C) | Technical platform expertise | Infrastructure Lead |
| AI/ML Lead | Consulted (C) | AI/ML technical guidance | Data Science Lead |
| GRC Lead | Consulted (C) / Informed (I) | Governance, risk, compliance advice | Compliance Manager |
Each role shows:
- Name and email
- Role title (e.g., "Security Lead", "Compliance Manager")
- Color-coded badge indicating RACI responsibility type
How to Set RACI Roles
RACI roles are configured globally at the organization level, then inherited by workflows:
- Navigate to Governance → RACI Model
- Configure the 5 roles with names, emails, and titles
- Return to this workflow — roles automatically populate
- If roles aren't set, you'll see a link: "Configure in Governance → RACI Model"
Best Practice
Set RACI roles once at the organization level. All workflows will inherit these assignments, ensuring consistent accountability across your AI portfolio.
Control Ownership (Coming Soon)
Per-control ownership tracking is planned for future releases:
- Primary Owner: Main accountability for specific controls
- Delegate Owner: Backup or support role
- Framework Mapping: Links controls to ISO 27001, NIST AI RMF, SOC 2
- Timeline Tracking: Assignment dates and last review dates
Risk Tab
Purpose: View all identified risks for this workflow from the MIT AI Risk Framework, their severity, and treatment status.
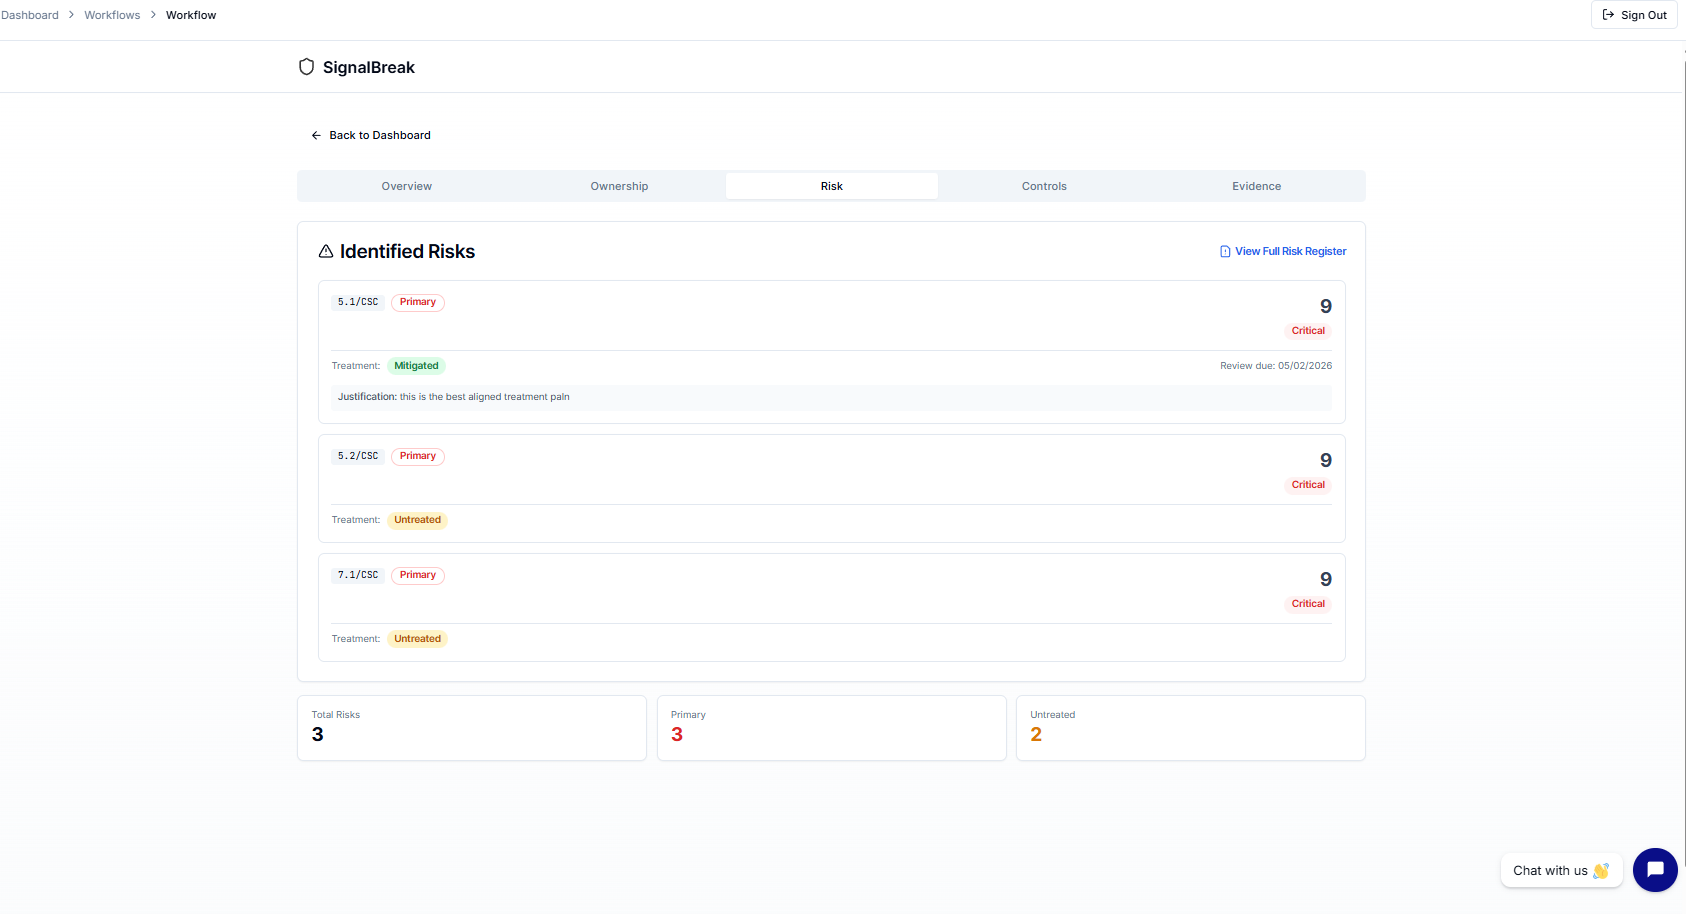
What You'll See
Summary Cards (Top Row):
- Total Risks — Count of all identified risks
- Primary Risks — Count of primary relevance risks (core AI risks)
- Untreated — Count of risks without treatment plans (action required)
Risk Cards: Each identified risk displays:
- Risk Code — MIT Framework code (e.g.,
MIT-RM-2.1) - Relevance Badge — Primary (red) or Secondary (slate)
- Title — Clear risk description
- Risk Score — Numerical score (higher = more severe)
- Severity Badge — Critical (red) / High (orange) / Medium (yellow) / Low (green)
- Treatment Status — Untreated (amber) / Mitigated (green) / Accepted (blue) / Transferred (purple)
- Justification — Why treatment approach was chosen (if documented)
- Review Due Date — When treatment needs re-validation
Risk Severity Levels
| Severity | Score Range | Meaning | Color |
|---|---|---|---|
| 🔴 Critical | 76-100 | Immediate action required | Red background |
| 🟠 High | 51-75 | Priority treatment needed | Orange background |
| 🟡 Medium | 26-50 | Scheduled treatment | Yellow background |
| 🟢 Low | 0-25 | Monitor and review | Green background |
Risk Ordering
Risks are displayed in priority order:
- Primary risks first — Core AI risks to the workflow
- Highest risk score first — Most severe at top
- Secondary risks last — Supporting or tangential risks
Viewing Full Risk Register
Click "View Full Risk Register" at the top to navigate to:
- Dashboard → Risk Management
This shows the complete risk inventory across all workflows, with industry benchmarking, trends, and decisions tracking.
How Risks are Identified
Risks are automatically synthesized when you complete workflow risk assessments in the Controls tab (see below). You don't manually add risks to this tab — they're generated based on your control configurations and MIT Framework mappings.
Controls Tab
Purpose: Document how you're treating each identified risk through controls, mitigations, acceptances, or transfers.
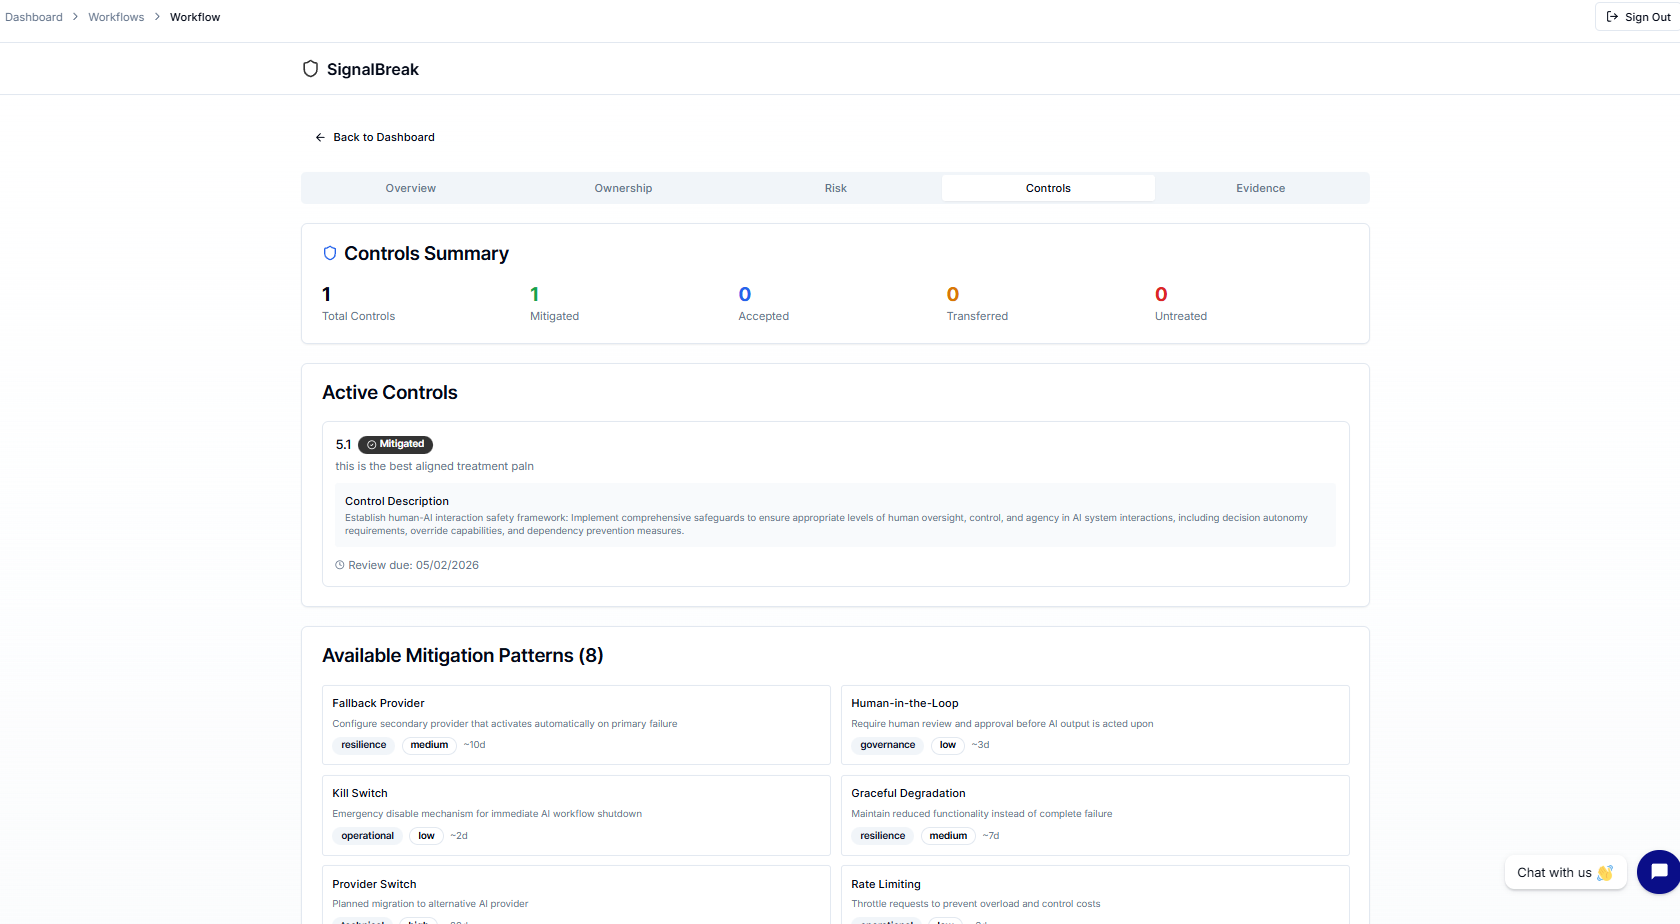
What You'll See
Summary Cards (Top Row):
- Total Controls — Count of all risk treatments
- Mitigated (green) — Risks with implemented controls
- Accepted (blue) — Risks consciously accepted
- Transferred (amber) — Risks passed to third party
- Untreated (red) — Gaps requiring attention
Control Gaps Section
Highlights untreated controls with amber background:
- Shows domain identifier
- Displays justification (if any)
- Enables quick gap identification for compliance
Example:
⚠️ Control Gap
Domain: MIT-RM-1.1
Justification: Resource constraints - deferred to Q2
Active Controls List
Each control displays:
Basic Information:
- Domain ID — Which MIT Framework domain this addresses
- Treatment Status Badge — Color-coded status
- Control Description — What control is in place
- Justification — Business rationale for treatment choice
Governance Tracking:
- Evidence Reference — Link to supporting documentation
- Decision Maker — Role who approved treatment (e.g., "GRC Lead")
- Decision Date — When treatment was decided
- Review Due Date — When control needs re-validation
Treatment Status Options
| Status | Meaning | When to Use | Color |
|---|---|---|---|
| Untreated | No treatment plan | Default for new risks | Amber |
| Mitigated | Control implemented | You've reduced the risk | Green |
| Accepted | Risk consciously accepted | Cost > benefit, within appetite | Blue |
| Transferred | Third party handles risk | Insurance, vendor responsibility | Purple |
| Avoided | Eliminated activity | Stopped using risky feature | Slate |
Available Mitigation Patterns
The Controls tab shows 4 categories of mitigation patterns to guide your control selection:
1. Resilience Patterns
Purpose: Technical redundancy and failover mechanisms
Examples:
- Multi-provider failover (primary + fallback bindings)
- Circuit breakers for API calls
- Rate limiting and throttling
- Graceful degradation strategies
Complexity: Medium-High Implementation Time: 5-10 days
2. Governance Patterns
Purpose: Policy and approval structures
Examples:
- Human-in-the-loop approval workflows
- Risk acceptance with authority approval
- Quarterly governance reviews
- Compliance framework mapping
Complexity: Low-Medium Implementation Time: 3-7 days
3. Operational Patterns
Purpose: Process improvements and monitoring
Examples:
- Continuous monitoring and alerting
- Incident response procedures
- Model performance tracking
- Regular audit scheduling
Complexity: Low-Medium Implementation Time: 5-10 days
4. Technical Patterns
Purpose: Infrastructure or system changes
Examples:
- Model versioning and rollback
- Input validation and sanitization
- Output filtering and guardrails
- Encryption at rest and in transit
Complexity: Medium-High Implementation Time: 7-14 days
Each pattern shows:
- Complexity Level (Low/Medium/High)
- Typical Implementation Time (days)
- Applicability — Which risk types it addresses
- Implementation Guidance — How to deploy
Documenting a Control
To document a risk treatment:
- Navigate to the Controls tab
- Identify the untreated control (amber gap indicator)
- Choose your treatment approach:
- Mitigate: Select a mitigation pattern, describe control
- Accept: Provide business justification for acceptance
- Transfer: Document transfer arrangement (e.g., vendor SLA)
- Add Evidence Reference:
- Link to policy document
- Ticket number (JIRA, Linear, etc.)
- Configuration screenshot
- Audit trail reference
- Set Review Due Date (recommended: +90 days for quarterly review)
- Record Decision Maker Role (e.g., "GRC Lead", "Exec Sponsor")
- Save the treatment
Good Evidence Examples:
- ✅ "Fallback provider configured, see binding #42 in Overview tab"
- ✅ "Human approval workflow implemented, documented in Confluence: [link]"
- ✅ "Quarterly model review process defined in JIRA-567"
- ✅ "Control documented in Information Security Policy v2.3, section 4.2"
Insufficient Evidence Examples:
- ❌ "We do this regularly"
- ❌ "Handled by team"
- ❌ "Documented somewhere"
Authority Matrix for Acceptances
When accepting a risk, ensure appropriate decision authority:
| Authority Level | Max Budget | Can Accept Risk | Required For |
|---|---|---|---|
| Delegated (Workflow Owner) | £5,000 | ❌ No | Low-impact decisions only |
| Committee (GRC Lead) | £25,000 | ✅ Yes | Medium risks up to £25k |
| Executive (Exec Sponsor) | £100,000 | ✅ Yes | High risks up to £100k |
| Board | Unlimited | ✅ Yes | Critical risks, unlimited impact |
Compliance Requirement
Risk acceptances require appropriate authority approval for audit compliance. Critical/High severity risks typically require Executive or Board approval.
Connecting Controls to Risk Register
Treatments documented in the Controls tab automatically update:
- Risk Tab (this workflow) — Shows treatment status per risk
- Risk Management → Risk Register — Organization-wide risk inventory
- Risk Management → Gaps → Untreated Risks — Gaps requiring action
Evidence Tab
Purpose: Demonstrate that your controls are working effectively through stability assessment and compliance evidence collection.
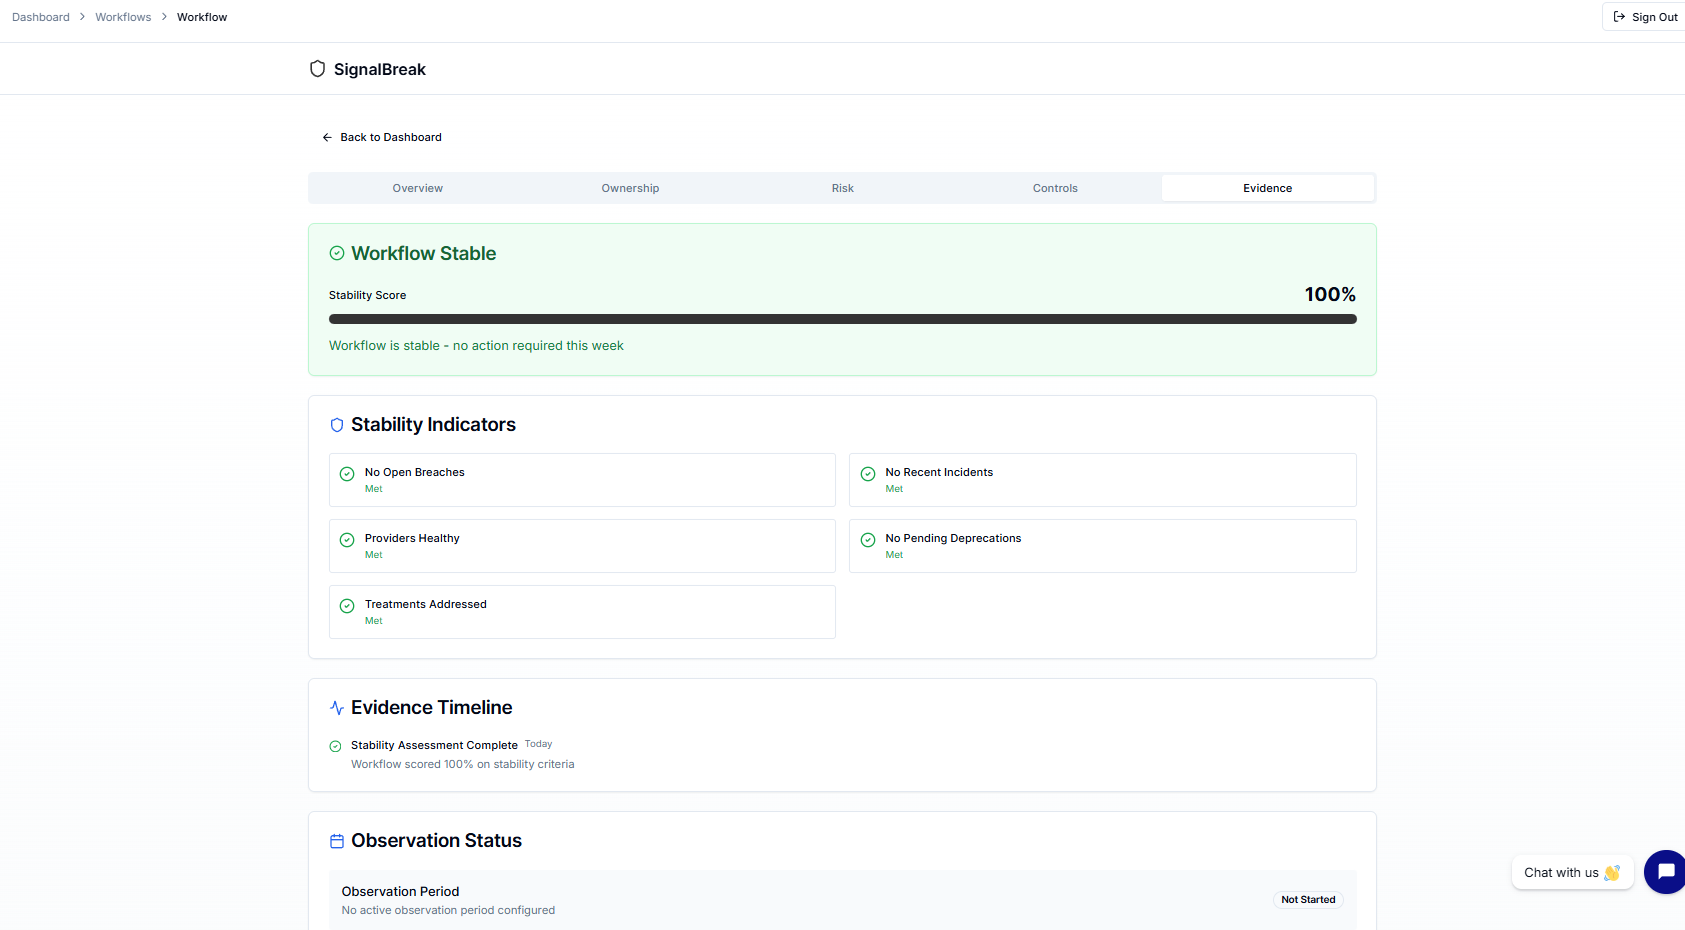
What You'll See
Stability Overview Card:
- Status: Stable (green) or Attention Needed (amber)
- Stability Score: 0-100% with progress bar
- Summary: Human-readable explanation of current status
Example:
✅ Workflow is Stable
Stability Score: 92%

All stability criteria are met. No open breaches, recent incidents, or pending
deprecations. Provider integrations are healthy and risk treatments are addressed.
Five Stability Criteria
Each criterion shows ✓ (Met) or count of items needing attention:
| Criterion | What It Checks | When It Fails |
|---|---|---|
| No Open Breaches | No unresolved security breaches | Any open breach exists |
| No Recent Incidents | No incidents in defined period | Incidents in last 30 days |
| Providers Healthy | All provider integrations healthy | Any provider degraded/down |
| No Pending Deprecations | No scheduled deprecations | Model sunset announced |
| Treatments Addressed | Risk treatments in progress/complete | Untreated critical risks exist |
How Stability Score is Calculated
Stability Score = (Criteria Met / Total Criteria) × 100

Example:
- 5 out of 5 criteria met → 100%
- 4 out of 5 criteria met → 80%
- 3 out of 5 criteria met → 60% (Attention Needed)
Thresholds:
- ≥80% = Stable (green background)
- <80% = Attention Needed (amber background)
Evidence Timeline
The timeline shows stability-affecting events:
Event Types:
- Today: Current open items requiring attention
- Active: Ongoing issues
- Pending: Upcoming reviews or expirations
- Upcoming: Scheduled deprecations or changes
Example Timeline:
✓ Providers Healthy (Today)
  All 3 provider integrations reporting healthy

⚠ Open Breach (Active - 2 days)
  Security incident SI-2026-042 under investigation

⏰ Treatment Review Due (Pending - 5 days)
  Risk MIT-RM-1.1 treatment needs quarterly re-validation

→ Model Deprecation Announced (Upcoming - 60 days)
  GPT-4 Turbo sunset scheduled for April 2026
Observation Periods (Post-Market Monitoring)
Coming Soon
Observation Status and Evidence Sufficiency sections are placeholders for future post-market monitoring integration. Once configured, these will:
- Track control effectiveness over defined observation periods
- Score completeness of evidence collected
- Support ongoing compliance demonstration
Why Stability Matters for Compliance
High Stability Score = Proof Controls Work
Auditors and regulators want to see:
- Controls are documented (Controls tab) ✓
- Controls are working (Evidence tab) ✓
- Issues are detected and resolved (Stability criteria) ✓
Use Cases:
- ISO 27001: Demonstrates ongoing control effectiveness
- SOC 2: Provides evidence of operating effectiveness
- EU AI Act: Shows post-market monitoring compliance
- Board Reporting: Proves governance processes are active
Improving Stability Score
If score <80%, address criteria in this order:
No Open Breaches (highest priority)
- Resolve security incidents immediately
- Document resolution in incident response log
No Recent Incidents
- Investigate root causes
- Implement preventive controls
- Update incident response procedures
Providers Healthy
- Check provider status pages
- Test API connectivity
- Consider adding fallback bindings
No Pending Deprecations
- Plan migration to replacement models
- Test alternative providers
- Update bindings before sunset date
Treatments Addressed
- Go to Controls tab
- Document treatments for untreated risks
- Set review due dates
Workflow Tab Navigation Tips
Quick Navigation:
- Use the tab selector at the top of the workflow detail page
- Tabs remember your last position when you navigate away
- Use browser back button to return to previous tab
Recommended Workflow:
Initial Setup:
- Overview → Create workflow, add bindings
- Ownership → Verify RACI roles are set
- Controls → Document initial risk treatments
- Risk → Review generated risks
- Evidence → Check stability baseline
Quarterly Review:
- Evidence → Check stability score (should be ≥80%)
- Risk → Review risks with upcoming due dates
- Controls → Update treatments, add new evidence
- Overview → Verify bindings are current
Audit Preparation:
- Ownership → Verify RACI assignments
- Controls → Ensure all critical risks have evidence
- Evidence → Confirm high stability score
- Risk → Export risk treatment summary
Related Documentation
- Risk Management — Full risk register, trends, decisions, gaps
- Provider Bindings API Reference
- Risk Scoring Methodology
- Scenario Planning
- RACI Model — Configure org-wide RACI roles